I will be honest, as much as I love to cook I usually leave the grilling up to Carolina Husband. But lately I have seen a lot what I think of as non-traditional grill recipes. Last night I gave grilled pizza a shot.
I came across the idea of cooking pizza on the grill a few weeks ago. I love brick oven pizza so I wanted to see how cooking on the grill compared.
 The Final Product
Overall I was a big fan. The grilled pizza has a thin crust, so it will cook fast. The final flavor and texture of the cooked crust is one with a smoky crunch, but with just enough "chewy" in the cooked dough to keep anything from tasting overcooked or burnt.
The prep and grilling process is pretty simple and once the pizza hits the grill grates it cooks in a flash. Not only does it taste good, but it is also a quick alfresco dinner.
So how exactly do you grill pizza?
1-Start with a few balls of homemade pizza dough. I make several batches of dough, separate it into portions and freeze it for quick dinners so I had some on hand. If you don't want to make your own, see if your local pizza place will sell raw dough.
2-Roll the dough into personal sized rounds (about 1/8" thick). The smaller, "personal" sized pizzas will be easier to handle on the grill. You will need to use flour or cornmeal to keep the dough from sticking as the rounds get rolled out. I used flour last night, but I think light cornmeal would add a nice texture and flavor.
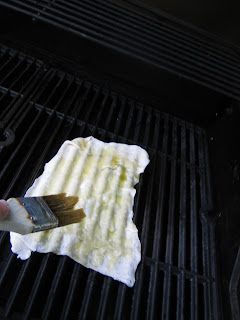
3-Heat the grill to medium high heat. Brush the top of each dough round with olive oil (I also added a bit of garlic) and place it olive oil side down on the hot grill.
 My dough round (or in this case dough square) brushed with olive oil. Ready for the grill.
4-The crust will set quickly (about 3 minutes). It will be set when it slides easily off the grill. While the crust is setting/cooking (olive oil side down), brush more olive oil on topside of the dough round. After first side of the crust sets, flip the round with tongs or a spatula.

Grilling the bottom side of the dough. Brushing olive oil to get the top ready to grill.
5-Once the "done" side is facing back up, top the pizza with toppings of your choice while the bottom of the crust cooks on the grill. Last night I used a little tomato sauce, basil from our garden and fresh mozzarella.
6-Once the toppings were added and both sides of the crust were cooked, I moved the pizza up to to top rack of the grill and closed the lid, just to keep the cheese melting.

Move the pizza to the top rack of the grill to keep the crust from burning, this way the toppings can continue to melt and warm.
That's about it. You should be able to grill several pizzas at once. Surprise your neighbors, invite them over for an backyard BBQ, open up a bottle or two of wine and instead of burgers and dogs, throw the dough on the grill.
If you give it a shot here are a few more tips.
-Get creative with your toppings, but have everything sliced and ready to go because the first side of the crust will cook very fast. Also the toppings should be minimal or the crust will burn long before the ingredients are warm or melted.
-Don't worry if the dough droops a little through the grill grate, it will firm up fast.


Can't wait to try the pizza! Looks delicious! Thanks for sharing.
ReplyDeleteWe use boboli crusts. Also put them on aluminum foil sprayed with cooking spray so they don't stick to the grill. I love pizza on the grill. :)
ReplyDeleteI saw this recipe on AccentHealth in the doctor's office the other day....it looks so good....I think i may give it a try too.
ReplyDelete